
Micro-Animations with Lottie
Table Of Content
Intro
Like when engaging in conversation, if our interlocutor speaks with a monotone and flat voice it becomes harder to pay attention to what they've to say and enjoy the exchange. Similarly, a static interface, without any dynamism, is bound to lose some of its users, or at the very list fell dull and unattractive.
Micro-Animations, or Micro-Interactions, can be the inflection in the voice, the hand gesture, facial expressions, that help the good orator to tell a story. Through micro-animations the interface can feel more "human", convey some of those emotions, as well as feel more cohesive.
Micros-Animations are often used to express:
-
Feedback - Use animations to convey the state of the application.
 Pull Down to Refresh by Ramotion
 -
Action - Help the user understand the results of their actions
 Submit Button by Colin Garven
 -
Manipulation - Emphasize the user's control over parts of the application
 Dialin' by UI8
Design to Development
Having tried to define what micro-animations are, dribbble is a wonderful site to explore searching for inspiration.
Chances are most of the animations are created with designer tools like Adobe After Effects, Principle, Flinto, or Framer - to name a few. How to bring them to life in a completed product then? AirBnB implemented Lottie: a rendering solution for After Effect files that has been widely adopted, and makes it really easy to use animations in your applications. Lottie has been ported to web, iOS, Android, and UWP - which is what I'll use in this demo.
To avoid creating your animation in Adobe After Effect from scratch, I used pre-made assets available at lottie files
LottieUWP
Now that we've defined an animation framework we can putting things together in a new UWP project.
⚠ Creating a new project make sure you're using a compatible SDK: Windows Build 10586+
Fire up Visual Studio, start with a new Blank App (Universal Windows), and bring the LottieUWP NuGet package in your project running:
Install-Package LottieUWPAdd the Lottie namespace in your MainPage.xaml:
<Page
    ...
    xmlns:lottieUwp="using:LottieUWP" />
    ...
</Page>
Lottie animations are defined using a json file exported using the the Bodymovin Adobe After Effects plugin. For this demo I'll use a star animation available at LottieFiles created by Michael Harvey
Once the json animation is downloaded, you can render it by either using the LottieAnimationView XAML control, or by defining it in code. A programmatic approach is preferable if you're going to instantiate components at runtime (i.e. items in a list). I've opted for the XAML control in this demo.
Bodymovin and Lottie allow using raster images in your animations. If you're using your own files, and image assets are required, make sure you specify the ImageAssetsFolder attribute in your LottieAnimationView.
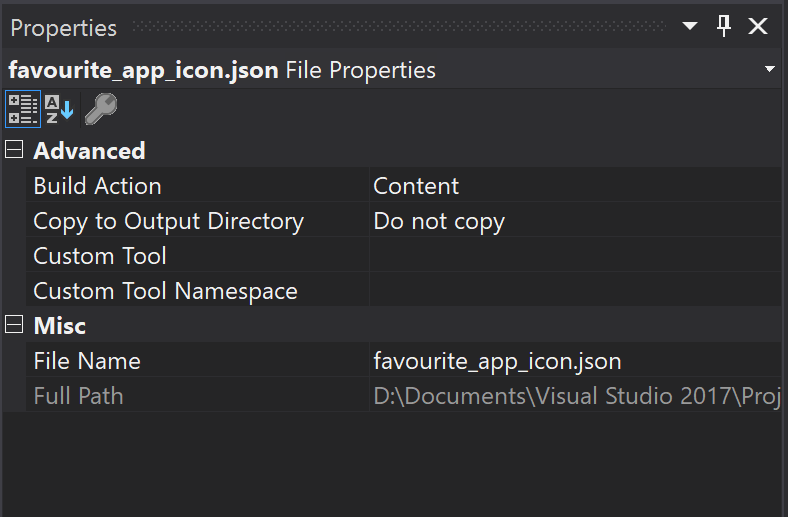
⚠ The json animations should be bundled in your application by setting the Build Step as Content Otherwise you'll receive the Error Message: "Unable to find file Assets/favourite_app_icon.json"
Add the LottieAnimationView control to MainPage.xaml
<lottieUwp:LottieAnimationView
    x:Name="LottieAnimationView"
    FileName="Assets/favourite_app_icon.json"
    AutoPlay="True"
    Loop="True"/>
Controlling the animation via code
To make the example a little more interesting, the animation shuold play in response to a user action. Remove the AutoPlay and Loop attributes from the Lottie Animation View. We'll control the animation implementing UIElement's Tapped event handler. Here's the final XAML code.
<Page
    x:Class="MicroAnimationsWithLottie.MainPage"
    xmlns="http://schemas.microsoft.com/winfx/2006/xaml/presentation"
    xmlns:x="http://schemas.microsoft.com/winfx/2006/xaml"
    xmlns:local="using:MicroAnimationsWithLottie"
    xmlns:d="http://schemas.microsoft.com/expression/blend/2008"
    xmlns:mc="http://schemas.openxmlformats.org/markup-compatibility/2006"
    xmlns:lottieUwp="using:LottieUWP"
    xmlns:controls="using:Microsoft.Toolkit.Uwp.UI.Controls"
    mc:Ignorable="d">

    <Grid Background="{ThemeResource ApplicationPageBackgroundThemeBrush}">

        <controls:DropShadowPanel
            HorizontalAlignment="Center" VerticalAlignment="Center"
            BlurRadius="10" ShadowOpacity="0.7">
            <StackPanel Width="300" Height="398" Background="White">
                <Image x:Name="BingBackground"
                       Margin="10" Width="280"
                       Source="http://c1.staticflickr.com/5/4438/36609628276_bee41dc564_n.jpg"
                       Height="280" Stretch="UniformToFill" />
                <StackPanel Background="White" Orientation="Horizontal" HorizontalAlignment="Right">
                    <lottieUwp:LottieAnimationView
                        x:Name="LottieAnimationView"
                        Padding="5"
                        FileName="Assets/favourite_app_icon.json" Tapped="LottieAnimationView_Tapped"
                    />
                </StackPanel>
            </StackPanel>
        </controls:DropShadowPanel>

    </Grid>
</Page>
The code behind handler in MainPage.xaml.cs controls the playback of the animation. When the user clicks, we start by pausing any running animation. If the image is not favorited we'll play the animation, otherwise we'll revert to the first frame, with the hollow star, setting the progress to 0. You can find the complete example on GitHub
public bool IsFavorite { get; set; }
private void LottieAnimationView_Tapped(object sender, TappedRoutedEventArgs e)
{
    if (LottieAnimationView.IsAnimating)
    {
        LottieAnimationView.PauseAnimation();
    }

    if (!IsFavorite)
    {
        LottieAnimationView.PlayAnimation();
    }
    else
    {
        LottieAnimationView.Progress = 0.0f;
    }

    IsFavorite = !IsFavorite;
}
Photo Credits: CHRISCARMA
Conclusion
This quick demo was to share the workflow, from Adobe After Effects to UWP app, and some useful links along the way. Hope you enjoyed it!